Initiate GIS Certificate Transfers
This User Guide outlines the steps on how to transfer Certificates in NEPOOL GIS (GIS). GIS Certificates can only be transferred after Certificates are issued and during an opened trading period. NEPOOL GIS dates can be found by clicking on the following link.
| A. Certificate Transfer Options |
In GIS, there are six different options for Certificate Transfers:
- Another Account Holder
- Retail SubAccount
- Reserve
- Banked
- Bulletin Board
- Back to Account
| B. View Active Certificates |
To view Active Certificates available for transfer in GIS, User takes the following steps:
- In the Account Dashboard, User locates the Account Status module.
- Under the Account Summary module, User clicks on a hyperlink under Account Activity as pictured below.

- User views Certificate inventory in the specific page of the clicked hyperlink.
| B. Transfer GIS Certificates |
User initiates GIS Certificate Transfers via the new Transfer page in NEPOOL GIS. User can initiate up to 20,000 REC batch transfers at one time.
- Log in to NEPOOL GIS.
- In the Account Dashboard, User clicks on the Transfer option from the menu bar as shown below:
![]()
- In the Select Batch Criteria section on the left pane, User selects one of the options from the Transfer Type drop-down.
![]()
- User enters data for any fields denoted with an asterisk. All fields not denoted with an asterisk are optional. Only available REC holdings options are displayed as options in the selection criteria.
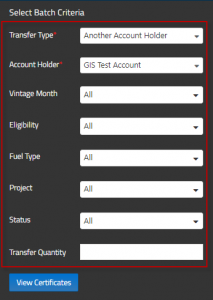 Note: In the Transfer Quantity field of the selection criteria, User can enter the total number of RECs to transfer without having to manually select the batch(es) in the right pane.
- Once all the options are selected, User clicks on the ‘View Certificates’ button to populate the requested data on the right pane.
![]()
- After clicking the ‘View Certificates’ button, the right pane populates the data result based on the options selected in the Select Batch Criteria.
![]()
Note: If Transfer Quantity was entered in the selection criteria, the Transfer Quantity column displays selected REC quantities for batches up to the quantity entered.
- In the Select Your Certificates section on the right pane, User either clicks ‘Select All’ button to select all the Certificates or enters in the specific quantity to transfer for each batch under the Transfer Quantity column.

Note: Clicking the ‘Select All’ or ‘Clear All’ buttons only impacts the REC batches on the current page. User can select or clear additional batches from multiple pages on the right pane.
- User clicks the ‘Transfer’ button to execute Certificate transfer to the designated Transfer Type option.
![]()
Note: After initiating a Certificate transfer to another Account Holder, automated emails are sent to both Transferor and Transferee. The transferred Certificates are marked as “Pending” in the Transferor’s Outbox until the Transferee either accepts or rejects the Certificate transfer. If the Transferee rejects the Certificate transfer, the Certificates will be returned to the Transferor’s account.
Click on the following hyperlink to download the New NEPOOL GIS Certificate Transfers User Guide.